
How to Teach the Circle of Fifths to Piano Students (Free Circle of Keys Printable)
The Circle of Fifths piano concept can feel like a secret code—but when students break the code, they discover it unlocks chord progressions, improvisation, and composition.
Why teach the Circle of Fifths in piano lessons?
Understanding the circle of fifths is one of the first steps toward helping students improvise, explore chord progressions, and create their own music.
The Circle of Fifths or Keys is the ultimate Circle of LIFE for a creative musician! The theory-packed ring breathes life into just about every aspect of music theory — from scales to chords to harmony. When pianists learn about the circle of 5ths, it boosts their theory skills, helps them make connections as they explore creative ideas at piano lessons.
Understanding the circle of fifths is a powerful step toward helping students learn to improvise at the piano.
Get the PDF free Circle of Fifths printables by clicking on the buttons below ⬇️
Download your free Circle of Fifths printable for piano students and start teaching scales, chord progressions, and creativity right away.
How to teach the Circle of Fifths

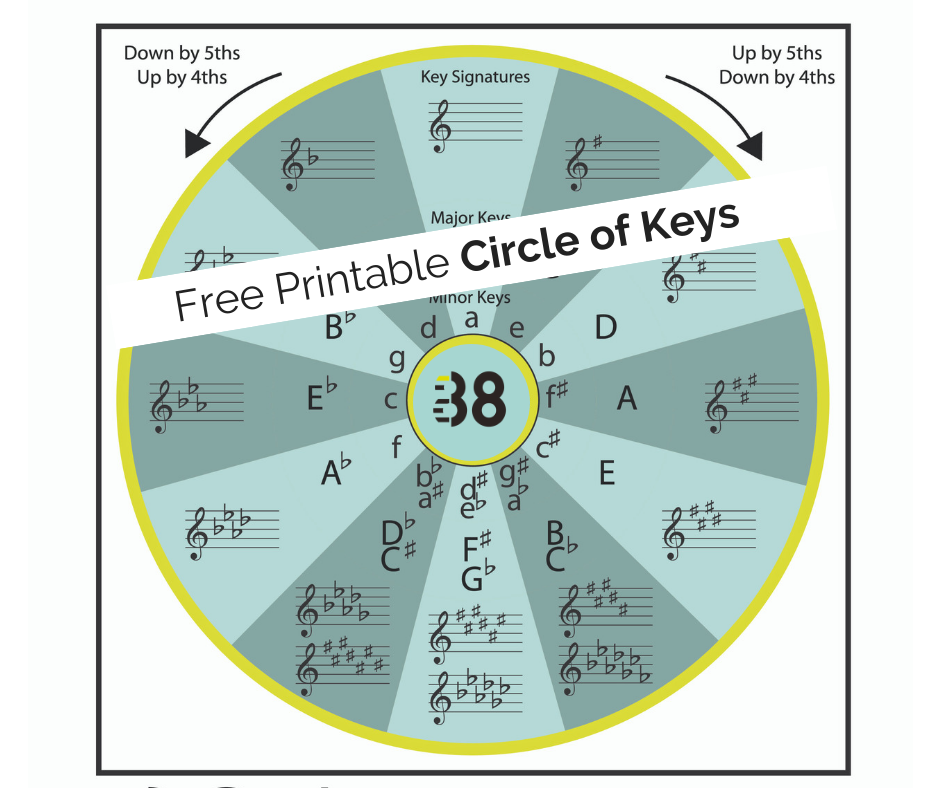
Print the large Circle and place it in your students’ three-ring binder for their reference. Print and cut the smaller Circles so students can use it as a “cheat sheet” when playing games. If you laminate the printables, then students can draw on the circle of fifths with a dry-erase marker, which is useful for some of the activities listed below.
Usually, I want students to understand why they do something before they do it, but on occasion, I change things up. Before I introduce the circle of fifths to beginners, I require everyone to memorize these two sentences, but give no reason why.
Fat Cats Go Down Alleys Eating Bananas
Butterflies Exercise And Don’t Go Catching Flies
OR…
BEAD • Gum • Candy • Fruit
Soon enough, they realize that these zany sentences relate to the order of sharps and flats.
As students master the order of sharps and flats, they can begin to uncover the theory behind the circle of 5ths through the activities below.
What the Circle of Fifths Teaches
⚫️ Five-Finger Patterns (first 5 notes of a scale)
Play Five-Finger Patterns beginning on C, then G, then D, and continue all the way around the Circle. Show students the secret to staying in the middle of the keyboard by beginning on Middle C, then UP a 5th to G, then DOWN a 4th to D, etc.
Students are moving around the circle clockwise, and this helps rookie piano theory students see why it’s called the Circle of 5ths. I prefer this way when playing 5-finger patterns because the top note of a pattern is the next key in the circle. This makes it easy for students to locate the next pattern on the keyboard.
Note: I use the phrase “Five-Finger Pattern” because it relates to students’ five fingers faster than the term pentascale. Also, it is SO similar to the term pentatonic—and I don’t want students to get confused.
Check out this past blog post about how I use iReal Pro as a backing track to accompany students as they play through the patterns around the circle.
⚫️ Tetrachords (scale of four notes)

Build on the knowledge of five-finger Patterns by asking students to play the first FOUR notes of the C major five-finger pattern in the left hand with fingers 5 4 3 2 and the first FOUR notes of the G major five-finger pattern in the right hand, fingers 2 3 4 5.
Next, show how the left hand can take over the keys of the right hand fingers (the G major five-finger pattern) and the right hand moves to the first four notes of the D major five-finger pattern.
Encourage students to see the patterns that emerge as they do this: The Circle of Fifths helps identify which two tetrachords make up every major scale. The pattern of WWH W WWH (whole and half steps) creates a major scale, and that’s why certain black keys are required.
A new black key is added to each scale, and it’s always the 7th scale degree, a half step below the root.
As students play around the Circle of Fifths, a new sharp is added. C = 0 Sharp, G = Fat (F#) D = Fat Cats (F# C#), etc.
To help students feel more comfortable with tetrachords, ask them to spin the Decide Now Wheel to determine a key and play the corresponding tetrachord. Next, students must improvise within that tetrachord, playing along with the app MusiClock—another favorite app that reinforces creativity, theory, and technique.
Get 50 Ways to Use Decide Now here. Learn more about MusiClock here.
⚫️ Major and Minor Scales
The next logical step for students is to play traditional scales. I follow the Squared Scale Routine developed by Bradley Sowash. Learn more here.
The Circle of Fifths can help you organize the order in which they are played. Some prefer to go clockwise, as mentioned above. Jazz musicians prefer to play counterclockwise around the Circle of 4ths because it echoes the typical chord progression from V to I. For example, C is the Dominant of F, F is the Dominant of Bb and so on.
Another option: begin with the C scale, then G, then F, then D—switching back and forth between sharp and flat keys.
Or, some teachers begin with the Db major scale because the fingering is so easy to learn, thanks to all the black keys!
When reviewing minor scales, the Circle helps students see the relationship between the major and the relative Minor scale—they share the same key signature. I like to say they share the same “piece of pie.”
⚫️ Key Signatures
Tips to help with reading key signatures:
Half a step up from the last sharp is the key.
The second-to-last flat is the key.
To find the relative minor of a Major key, count three half steps down.
When playing games and drilling during Off Bench Time or in group lessons, I let my students refer to the Circle of Fifths “cheat sheet” as much as they want. This will help them see the benefit of the Circle and prompt them to return to it often. Learn more ideas for using the circle of keys in group lessons here.
My goal for students is to recognize key signatures so quickly that when they see 5 flats, they immediately know the key is Db major. This takes repetition and reinforcement.
That’s when flash cards or an app like Tenuto come in handy.
One more takeaway...
When analyzing music and while composing, the Circle of Fifths helps piano students see the relationship between keys. For example, it would be common to modulate from D to A because they are only one black key away from each other, and A is the dominant key of D. It would be more unusual (but not impossible) to modulate from the key of D to F because of the difference in key signatures.
⚫️ Chords
The Circle of Fifths is ideal for teaching chord progressions and for showing the relationships between chords.
Notice that primary chords live right next door to each other in the Circle.
For example, the Dominant of C, which is G, is to the right of C, and the Subdominant chord, which is F, is to the left.
In addition, the diatonic chords in the Key of C (chords that live in the key) are the same as the relative minor keys of Dm, Am, and Em.
With a laminated Circle of Fifths, piano students can circle the diatonic chords of any key with a dry-erase marker and then choose a few to play and improvise with.
To explore this relationship between chords, ask students to circle three chords in neighboring “pie slices.”
For example, piano students might circle F, Dm, and G with little thought for how these might sound when played one after another.
Then ask them to play the three chords in a different order, include the C (tonic) chord at some point, and experiment with various patterns on the chords. Once a preference develops, this random exercise can easily become the basis of an improvisation or even a composition!
Composers like Bach and beyond, progress around the circle to create movement in their compositions. The standard ii-V-I progression or cadence that jazzers use is easy to spot in the circle. In addition, many composers add secondary dominants for color. Point students back to the Circle of Fifths as a visual aid as you get under the hood of repertoire.
How can you make the circle of fifths easier for piano students?
Invite your students to play and create with the theory they’ve learned from the circle of fifths.
Start with a simple C major five-finger pattern, then introduce the interval of a fifth. As students begin to see—and feel—that the circle of fifths is built on moving up by five, the concept starts to click.

From there, you can assign worksheets…
or you can challenge them to play five-finger patterns around the circle in time with a backing track.
I know which one sounds more fun.
And I have a feeling your students will too.